
Hotcig R150 TC Mod
Thanks to GearBest.com, we have the black HotCig R150 TC mod to review, it also comes in a silver version.
Also sent with the R150 to review, was the matching Hotcig Drip Tip which also comes in a wider version Here
As always this review will be our honest, unbiased, opinion of these items.
UNBOXING
The package from GearBest, was sent using FedEx express shipping and arrived in 5
days from the time the order was placed.
Despite the adequate packing & bubble wrap used by GearBest, FedEx thought it would be a good idea to play football with our parcel & while the mod & DripTip themselves were fine,
their containing packaging was not.
First the Drip Tip, this comes in a fancy glass vial, with some shredded bamboo (at least we think that is what it is) packing inside it, to prevent the DT moving around & smashing the glass,
it is then capped with a cork stopper. Unfortunately, we can not show you a photo of this, due to FedEx's rough handling of the package, so instead here is a picture copied from the GearBest product page.
Below that shows the condition the one we received arrived in. As you can see GearBest had wrapped this in 3 layers of protective foam, which should have been good enough under normal transporting conditions.
Next the R150 Mod, again, GearBest had protected this, using sufficient bubble
wrap protection for normal transportation conditions, the fault is not GearBest's for the condition that these items arrived in.
We place the blame squarely on FedEx's shoulders for the rough handling during transport, no package can be bubble wrapped enough for if the transport company workers decide to play football with
your package.
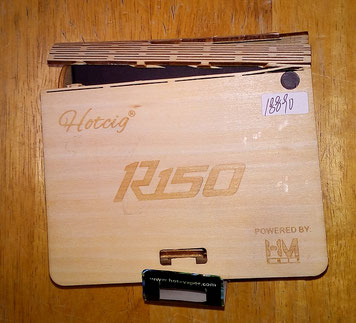
The R150 Mod comes in a rather unique wood (possibly bamboo or balsa) gift box, this would make a nice decorative box for storing small parts or something, if you wanted to & if yours arrives
in better condition than the one FedEx delivered.
Credit goes to Hotcig, that the mod itself survived & was undamaged, the way it was packed inside the box ensured that rough handling during transport did not see it arrive DOA. We are also confident, the material (wood) of the box itself probably played a part in protecting the mod, a cardboard or plastic box may not have fared so well.
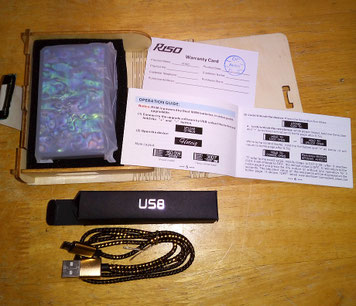
After cleaning the loose glass & other debris, the contents inside the box could be finally revealed. Inside you will find the R150 mod, a warranty card, a user manual & a rather nice braided, gold flecked USB cable - the picture does not do the cable justice, it is one of the classiest looking USB cables we have seen.
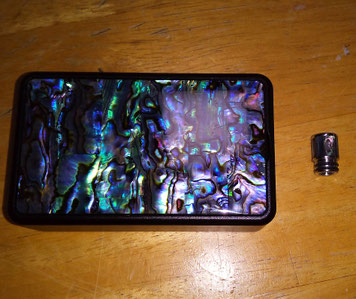
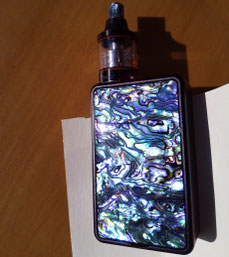
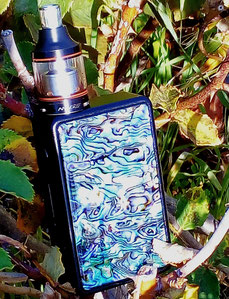
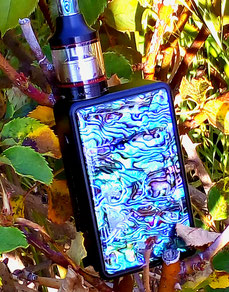
The Abalone shell on the sides of this mod & on the matching Drip Tip just ooze class!
For the price this pairing can be picked up for (under $100Au, on sale), it is a a steal, this device looks every bit as good as, some far more expensive, high end mods.


IN USE
The R150 boasts a waterproof chip but Hotcig warn not to use the mod when wet.
Unlike mods that have a waterproof housing, the R150's chip (we suspect the entire PCB) is waterproof, which means if it gets wet, it is not going to hurt the electronics on the main chip board
but this does not mean it won't cause problems if the mod is wet & you try to use it.
Photo taken By HotCig during their own testing.
For example, water in the battery compartment is likely to cause a short circuit between the batteries, this could be very dangerous.
What this feature does though, is it ensures that should ejuice get onto the chip, from a leaky atomiser etc, then the mod is going to continue to function fine. Ejuice on electronics is not a
good combination, just like other electronic devices & any liquids, they don't mix & will likely damage your device. With this waterproofing feature, Hotcig engineers have put some
thought into protecting the device from the possibility of leaking ejuice.
The R150 has a Wattage mode, Ni, Ti, SS & Ww Temp Control modes. Exactly what Ww mode is, is not explained in the user manual or on the Hotcig site, some other experienced users have
speculated that this is a Tungsten TC mode, for use with ceramic coated Tungsten coils.
When you get the mod & install batteries, it will be in Wattage mode, which has a range from 1W up to 150W.
This is the mode the majority of testing was done in & in this mode it functions like many other VW devices. If you hold either of the up/down buttons the wattage increases in 0.1 increments
& scrolls very fast, much faster than practical for general use. The best way to adjust the wattage is to scroll close to your desired setting then click the up or down button several times
to dial it in.
Holding both the up & down button at the same time will lock the wattage, so when you accidentally click the up or down button, the wattage will not change when locked.
The instructions in the manual are not very clear (throughout in fact), on how to get into the TC modes but you need to lock the wattage, then hold the up botton for a few seconds, then rapidly click the up button & you will see the different modes come up on the screen, when you see the TC mode or Wattage (Power) mode you want, click the fire button & the device will be in that mode. This will be confirmed when you look at the screen, as you will now have either a wattage display or a temperature display, with the mode the device is in lit up below that.


With the limited amount of testing done in SS TC mode, the TC function seemed to be working fine. When you enter a TC mode the temp will be in degrees F ranging from 200F - 600F, if you hold the
+ or - button to scroll past those temp limits, it will jump into degrees C, with a range from 100C to 300C.
To change the wattage for your TC mode, you will need to go back into power mode & make the adjustment, so it is best to set this before going into the TC mode you want.
Once in TC mode, you can hold the + & - buttons to lock the temperature, so you won't accidentally bump those buttons & change the temperature setting.
This mod does have upgradeable firmware & there is a firmware update for it but we were unable after an hour or more of trying to update the firmware. Not that we needed a firmware upgrade,
the mod is working fine for us just how it is but we wanted to see how difficult it was to upgrade. We tried to follow all the steps correctly, several times but were unable to uncompress the
.DFU file. Maybe this needs a Mac to work, we really don't know but we don't see a problem with the firmware it has, rather than brick the mod we gave up.
The 510 connection has a gold plated positive pin, which is spring loaded, with stainless steel negative threads. It is mounted flush to the top of the mod, so all your toppers are going to sit
flush on the mod.
The placement is centered between the left & right sides & an equal distance from the screen's side.
The maximum size atomiser that we would use on it is 25mm diameter, which will be flush to the sides of the mod but because the edges of the mod are rounded, it will have a small gap between the
mod & the tank, you won't have this problem with 22mm atties & with 23mm atties you almost do not see a gap. However, using the Limitless Plus with it's 25mm diameter on top of this mod
does not look out of place at all, the sides of the mod line up with the outer of the RDTA, the small gap where they meet is barely noticeable.
When you first put a new atomiser onto the mod & try to fire the device it will ask you if it is a new or old coil.
This is great if you are using TC modes, though it isn't needed for using the mod in Power mode but it isn't a big deal, just press the up or down button & then the device will fire. If you
don't click up or down buttons, you will not be able to vape until you do.

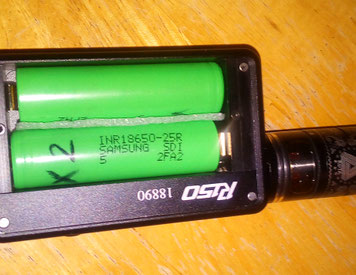
BATTERY SLED & ACCESS
The battery sled on this mod, is our least favorite feature of the device.
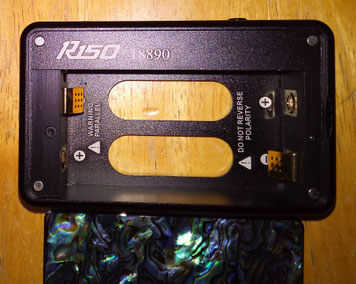
First, a WARNING - make sure you put your batteries in the correct way into this mod!!!
Thankfully, the positive & negative terminals are clearly marked, with the springy terminals at the negative end, where you would intuitively expect them to be.
Unfortunately though, this mod does not appear to have reverse polarity protection, so there is a good chance that if you install your batteries incorrectly, that you may short out the
electronics or damage your batteries. Hotcig has put a warning inside the mod's sled about this.
Clearly marked inside the sled is "Warning parallel", this does not mean install your batteries in parallel, this mod is designed to use batteries in series & if you look at the terminal
markings it is clear which way to place your batteries into the mod.
There is no ribbon to help you remove the batteries when they need recharging, instead both the side panels of the mod are removable & held on by 4 magnets each, one in each corner. To lift the panels, slide your thumb nail into the bottom edge of the side panels and lift up or you could use a small screwdriver or knife etc if you have no thumb nail.
With the panels off, there are 2 cut outs that allow you to push the batteries out from the back to the front, be careful not to push too hard & have you battery drop onto the floor, placing
your other hand over the front of the battery compartment is a good idea.
The batteries are held in place on the negative terminals with dimpled springy clamps. These work fine for making connection but when removing your batteries, they will cause damage to the
protective wrap on your battery.
This is a brand new battery, after being removed once, which had never been used except for the first time in this mod.
As you can see, after just one use in this mod, there is already signs of damage, this may be a huge con for some of you. However finding new wraps for your batteries is not difficult and it pays to keep some around for if/when needed. Although it must be said, Hotcig could have used a better battery sled design, with better positive & especially better negative terminals.
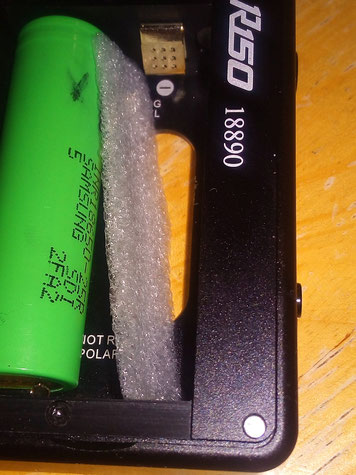
Also there was some play in the batteries, when shaking the mod about, not really rattle but we could sometimes feel the batteries shift inside. This was easily solved by using a thin strip of
foam packing material, which GearBest had provided, wrapped around the Drip Tip
bottle.
Simply cut a piece the width & length of an 18650 battery & after placing one cell into the sled put the foam in then insert the other cell. After applying this fix, the batteries are held in tight & do not shift around.


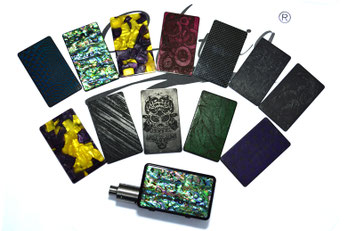
While you may not want to change the look of this mod, Hotcig has given you the option to change the side panels, which can make the mod look completely different.
These photos were taken from the Hotcig site, to give you an idea of the available options, which Hotcig say they will be expanding.

Here are some pictures taken of the mod in sunlight, to try to show just how good it looks but they pale in comparison to how beautiful this mod looks in your hand & up close.
FINAL THOUGHTS
We are a little conflicted about this mod, there are some big cons about it, especially in the battery sled but we love the class that this mod exudes.
It's finish is top notch, the black coating is holding up extremely well, it has been put through its paces now for around four weeks & there is not a single scratch on the housing.
The mod feels very solid, like you'd expect from a high quality device, it's very compact for a dual battery mod & sits comfortably in the hand due to the rounded edges.
The Abalone shell side panels are undoubtedly what make this mod look high class, the matching Abalone Drip Tip just adds to that class.
Having the option to change the side panels for a complete new look is nice also but you may have to contact Hotcig to find them & see what they have available.
Overall we give this mod a thumbs up but with reservations, be sure you learn about battery safety before using this mod, then be diligent about battery safety when changing out the batteries
& then this mod may make you a very happy vaper.
Also keep some spare 18650 battery wraps handy, as you will likely need them.